Screen Recording
 Screenshot Capture
 GIF Capture
 File Sharing & Collaboration
 Jumpshare AI
The steady uptick in remote work has spawned a wide variety of enterprise communication platforms. One of the best among these, if not the premier choice for many teams, is Slack.
Slack’s web, desktop, and mobile apps are all about streamlining communication. Conversations don’t have to be all business, though. Every now and then, when words just aren’t enough, there are few ways to add flair to an exchange better than replying with an animated GIF. In what follows, we guide you through how to send GIFs in Slack. We also explain how to use Jumpshare to easily make and share your very own GIFs!
Table of Contents
- How to Share GIFs on Slack from Anywhere Online
- How to Upload a GIF in Slack
- How to Use Giphy in Slack
- How to Make Your Own Slack GIF Using Jumpshare
How to Share GIFs on Slack from Anywhere Online
The first and most straightforward way to send GIFs in Slack conversations is to lift them from your most frequented GIF resource on the web.
1. Search for a GIF of choice on the web using Google or a GIF search engine such as Tenor or Giphy.
2. Once you’ve found the one you like, right-click it and copy the image address or link.

3. Within the Slack web or desktop app, pick a Direct Messages thread or Channel from the left sidebar. In the mobile app, these can be selected from within the Home tab.
4. Paste the copied link into the message box below and hit the Send button.
This will share the link to the conversation along with a preview of the GIF.
How to Upload a GIF in Slack
If you happen to have a folder full of trendy GIFs downloaded to your computer, as many meme connoisseurs surely do, you may upload them directly to a Slack thread.
1. Click the plus icon (+) below the message box and select Upload from your computer or simply hit Ctrl + U while within Slack.
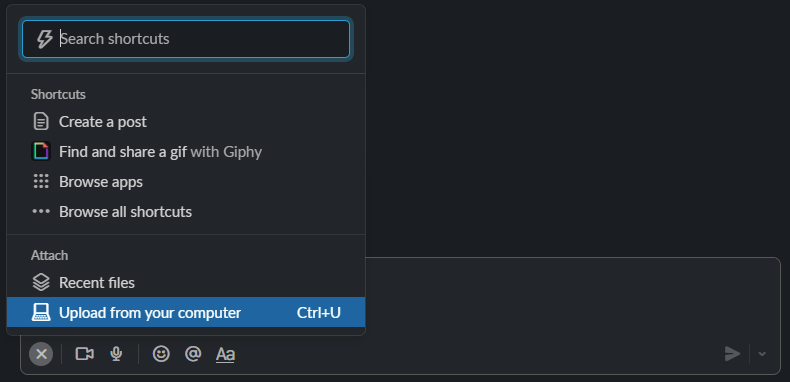
2. Select a GIF and select Open.
3. Hit the Send button.
How to Use Giphy in Slack
Perhaps the best route to recreational GIF sharing within Slack is to add an app to it that handles the grunt work for you. The most popular among these would have to be the Giphy app. Here’s how to add Giphy to your Slack workspace.
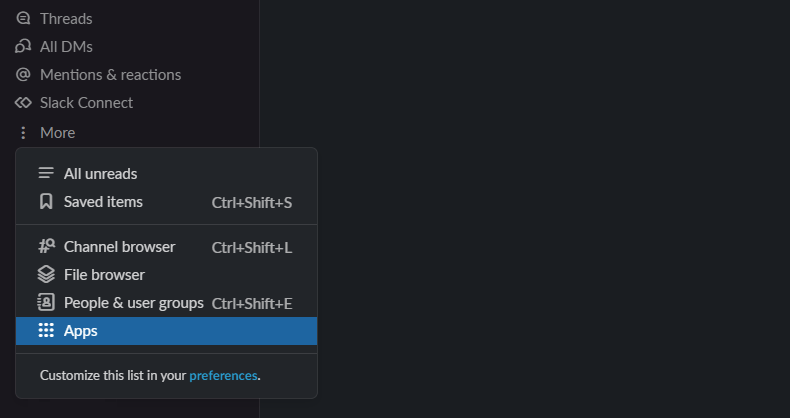
1. Within the Slack desktop or web app, select More > Apps from the left sidebar.
2. Enter “Giphy” into the search bar at the top.
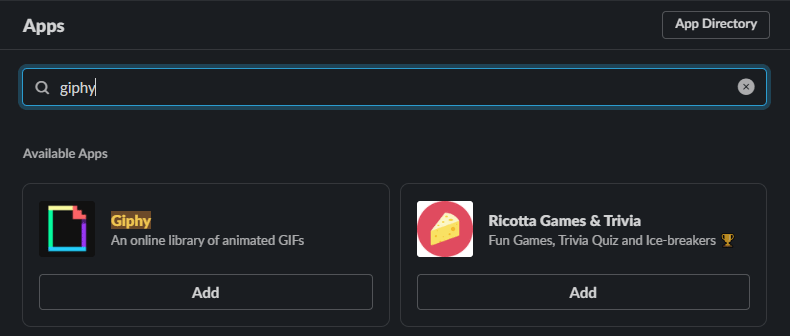
3. Select Giphy from the search results. On the page that you’re taken to, click Add to Slack followed by Add Giphy Integration.
Alternatively, you may point your web browser of choice directly to the Giphy app page in the Slack App Directory, then click Add to Slack followed by Add Giphy Integration.
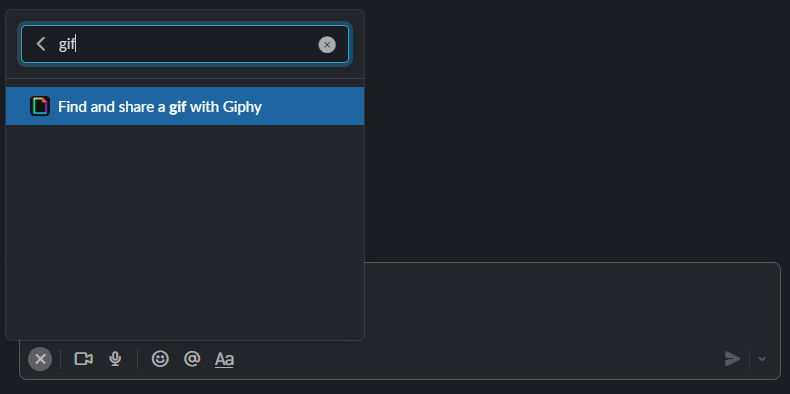
4. Once the installation process is done, click the plus icon (+), enter “GIF” or “Giphy” into the search bar within the pop-up, and select the Find and share a gif with Giphy shortcut.
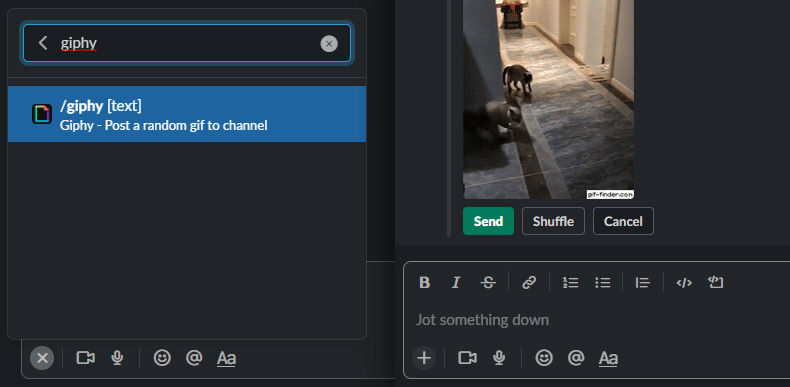
5. Enter a keyword into the search bar that follows and the app will display a single random GIF. Click the Shuffle button until you find one that you like, then hit Share.
A quicker way to do the same would be to enter “/giphy your search term” (without quotes) into the message box. This will instantly share a random GIF matching the entered search term.
You can even set the Giphy app to let you preview and shuffle this GIF before it is shared. To do so, once again, select More > Apps from the left sidebar, pick Giphy from the list of installed apps, and click the Configuration button. On the configuration page, click the little checkbox beside the Enable Giphy previews option and hit Save Integration.
How to Make Your Own Slack GIF Using Jumpshare
GIFs aren’t just a fancy way to react to conversations. You can make your own GIFs for Slack to communicate an idea to your colleagues or guide them through a tough process. Recording your screen and converting the result to an animated GIF isn’t the simplest thing, however, unless you know the right tool to use.
You needn’t fret if you don’t because we do! Jumpshare offers an easy-to-use screen to GIF recorder for Windows and Mac. Here’s how it works.
1. Download the Jumpshare desktop app and install it.
2. Launch the app and sign up for a Jumpshare account if you don’t already have one.
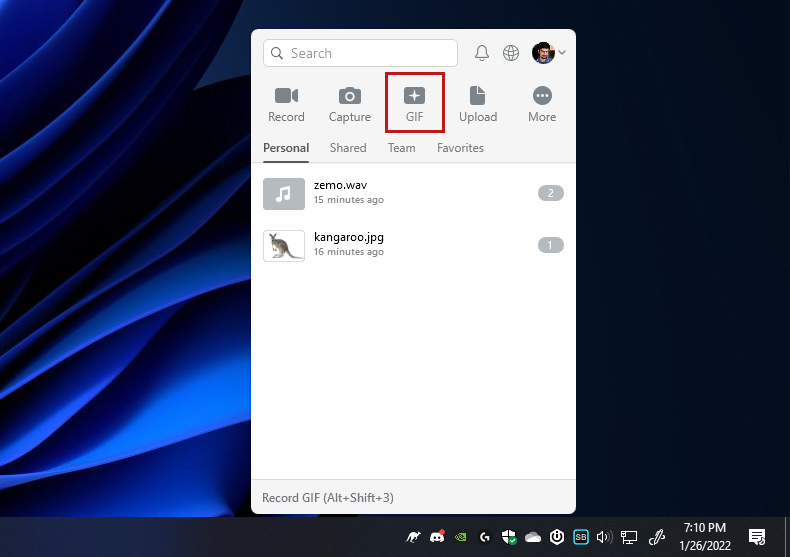
3. Once that is done, click the GIF button at the top of the app to begin a GIF recording. You may also hit the GIF recording shortcut at any time (Alt + Shift + 3 on Windows or Command + Shift + 8 on Mac by default) with Jumpshare running in the background. You can change this key combination from Preferences > Shortcuts.
4. Adjust the position and size of the recording window as needed or switch to Fullscreen to capture everything.
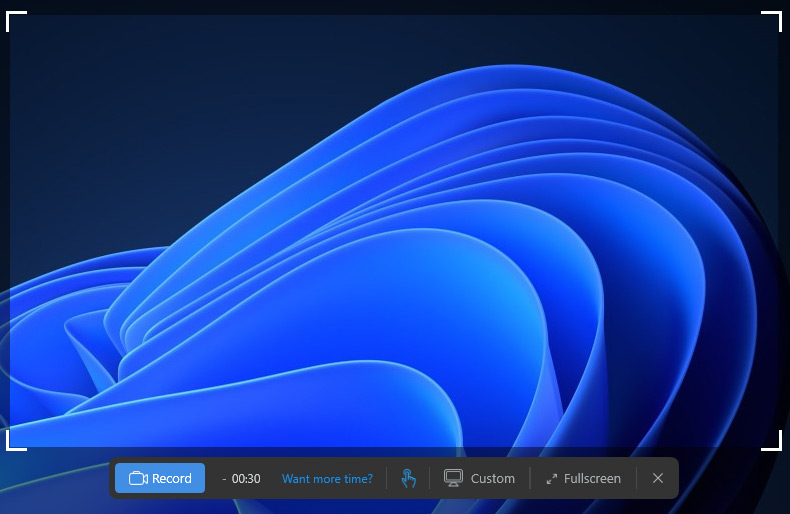
5. Hit the Record button to begin capturing.
6. You can now click Draw to highlight key areas of your recording area in real-time, Pause the recording, trash it, or start over.
7. Once you’re done and happy with your recording, hit the Finish button. This will automatically upload the recorded GIF to your Jumpshare library and copy its link to the clipboard.

8. Open up a Slack thread, paste the copied link into the message box, and hit Enter. A link to the GIF should appear in the resulting message along with an animated preview.
That’s all there is to it! Go ahead and post some GIFs in Slack right now and while you’re at it, share Jumpshare with your team as well!